7 Canva hidden tricks you need to know!
If you’re looking for some hidden secrets to improve your designs, we’re going to show you some Canva tricks that a lot of people don’t know about.
This free online tool was launched in 2013 with a mission to ensure that anyone in the world can create any design to publish anywhere.
In addition to the basic features of Canva, such as creating different designs for social media or for printing, we took the opportunity to list the best features that can upgrade your business.
You can also check out other tips that you probably don’t know in the app.
Some of these options work better if you are a Canva Pro subscriber, but follow the steps below and find new opportunities to surprise your customers even using the tool for free.
1. Transform designs into responsive websites
The first of the hidden tricks that we want to introduce you to is the possibility of transforming, with Canva, your designs into websites that can be clickable, that is, responsive.
In this way, you will be able to create a link to your Instagram bio, for example.
You can even create an interactive digital card, responsive menu, or portfolio to send to customers.
First, you need to create your design or open the one you would like to share.
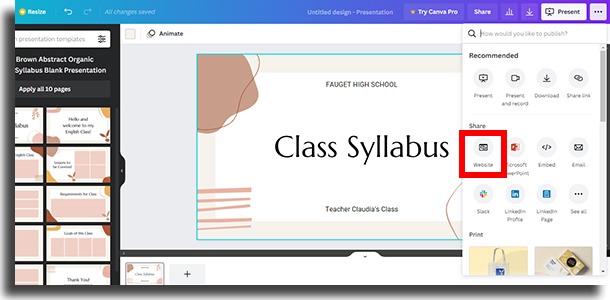
After that, in the menu in the right corner of the page, click on the three dots.
Finally, you can type in the search space for the term “website” or scroll down the menu and, in “share”, find the term “website” and select it.
At this point, a tab will appear for defining a “web style”. There are four different styles: presentation, scrolling, classic navigation. and standard.
See the features of each below:
- Presentation: creates a site with several pages next to each other, requiring you to click on the left and right arrows to view each page.
- Scrolling: as the name suggests, this is that single page style where the reader scrolls down to view the other pages.
- Classic navigation: Much like a standard website, this multi-page style features a top-right menu on the home page. This cover will be the first part of your design and the names of each page determined in your design will be presented in this menu, in the form of a navigation bar.
- Standard: Similar to classic navigation, but with just a single page and the same top navigation menu.
Having defined your preferred style, now click on the “open site” button and check the result.
Finally and to send to your customers, copy the link in the address bar of your browser.
2. Edit a PDF
A recent super feature of Canva that few people know about is the ability to edit a PDF.
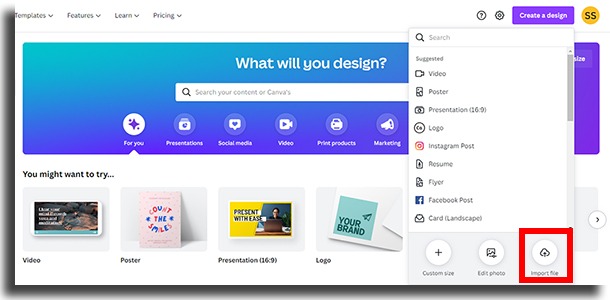
Start on the website homepage and click on “Create a design”.
At the bottom of the menu that opens you will find the option “Import file”.
Clicking on this option will take you to select a file saved on your computer.
Then select the file so that it can be downloaded in Canva.
Next, open the file, click on the texts and edit what you need.
Save the file as you like, in PDF, PNG, or other available formats and that’s it, another one of the master hidden tricks on Canva!
3. Blurring your photos
Have you always wanted to create a blur effect in your photos but didn’t know how?
So grab your notebook and save this step-by-step:
Open a new file in your Canva and insert the photo that will be blurred.
Then duplicate the photo and remove the background from one of the duplicate photos.
Attention, if you do not have Canva Pro, this tool within the site will not be enabled.
Don’t be discouraged, you can choose another app for that.
Just check out our app suggestions to remove photo backgrounds.
After removing the background from one of the photos, select the other one – which still has the background – and in the top menu of Canva click on the “Edit image” option.
In the sidebars that will appear, select “blur” and scroll the cursor to the sides, until the blur of the photo is to your liking.
Now just position the photo without background over the blurred image, with the images superimposed correctly and that’s it.
Now you have your blurred photo and you can save your design.
Definitely another one of the Canva hidden tricks on your list!
With these super tips, your photos will look like they were taken from your iPhone.
4. Make GIFs to post on social media
Customizing GIFs to post on your social media or to send via WhatsApp to friends is also one of the tricks that few know in Canva.
The site has a plethora of animated image backgrounds, as well as several options for moving elements.
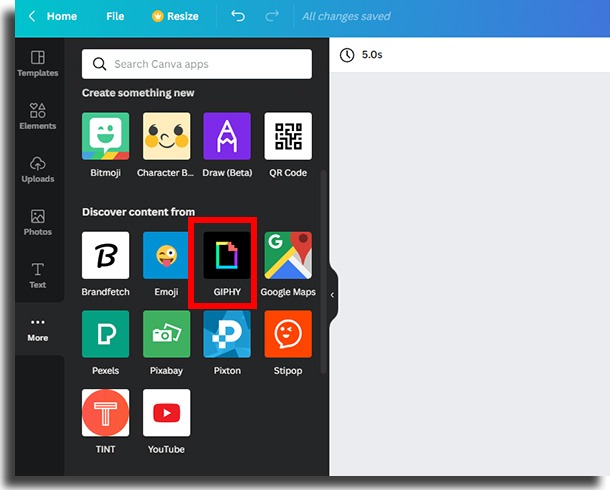
All this not to mention that it is possible to use GIPHY within Canva itself.
Of course, if you prefer, just use and abuse your creativity and upload your files.
Once done, just save the file in GIF format.
Now, if you like using GIFs but don’t want to use Canva, here are 10 other best ways to create them.
5. Create charts
Another wonderful feature that can elevate your presentations, and which is also one of the Canva hidden tricks, is the option to create graphics.
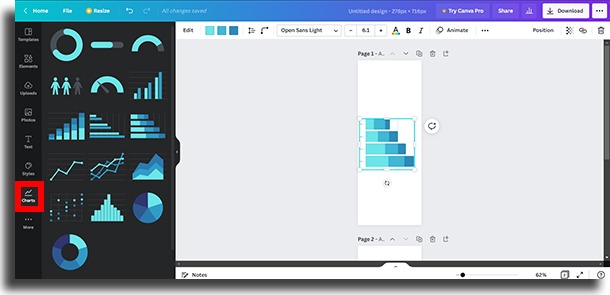
In the same way, as you did above, open the side menu and look for the “More” option.
Click on “charts” and you will see more than 15 options that can be customized by changing colors, data, and settings.
In addition, there is the possibility of connecting to Google Sheets.
All this in a simple and fast way, just by logging into your Google account and accepting that Canva accesses your information.
As a result, spice up your presentations with Canva charts quickly and easily.
6. Generate QR code
Have you ever used a QR Code? Do you know what it means?
The acronym QR Code, or “Quick Response”, means quick response.
And this is one of the great reasons for the usefulness of this technology, especially linked to marketing.
With the main focus on eliminating a few steps, this two-dimensional version of a barcode can be scanned by most cell phones through the camera.
This code leads to a URL address, location, email, phone or contact number, etc.
And in Canva, you can create your own QR code just like the big brands.
First, open or create your design.
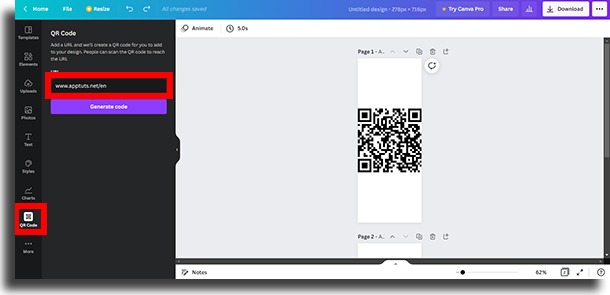
Then click on “More” and search for “QR Code” and a menu will appear.
Next, enter the URL of the site in the generator in the menu and a code will be created.
Finish by inserting the code into your design and save.
And done! When scanning the QR code with the cell phone camera, the person will be directed to the designated website.
7. Embed the design into a blog or website using HTML code
Finishing our tips and suggestions, we will show you how it is possible today, to minimize the work of those who use blogs or websites.
Writers constantly need to use image-editing software to host images on their pages.
If you have a blog or website, you know how much time and work goes into this step.
From downloading your images and uploading them to the place where they will be hosted, to knowing and understanding the HTML language.
So take note of the last of the Canva hidden tricks now and to count on practicality in your favor!
First go to the file with your images.
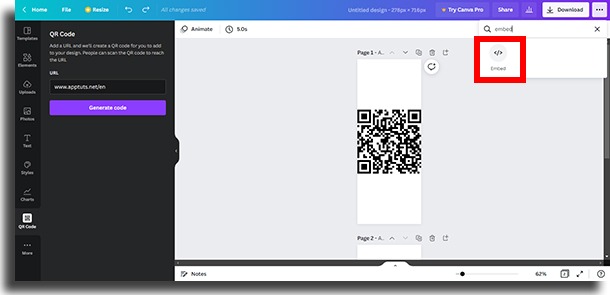
Then click on the three dots on the top right of the screen.
After that, search for “Embed”, click and a dialog box will appear.
Click “Embed” again and the image links will be created instantly.
Finally, be aware that when updating or modifying your designs in Canva, the editing of the images will be automatically adjusted in the hosting location.
And you, did you already know these 7 hidden Canva tricks?
Tell us in the comments which of these options you will use from now on.
