How to edit videos with Canva
This amazing tool continues to surprise and improve features, making it easy to edit videos with Canva.
Of course, this functionality has been around for a long time, however, it was necessary to know more about the Australian graphic design program to make good use of the techniques and create powerful videos.
The number of users who seek the platform to create their posts and videos for social networks such as Instagram, for example, has considerably increased, which has challenged developers and has brought quality-of-life improvements.
You can do a lot these days using Canva for free, which wasn’t so common about a year and a half ago.
Recently, the platform has improved features and it is much easier to create and edit your videos with Canva, both in the online and mobile versions.
Its simple and intuitive interface has led Canva to spread among the more than 60 million active users in 190 countries. Big companies like PayPal, American Airlines, Salesforce, and Marriott International use the tool.
Below we’ll show you step-by-step the features to rock your videos, inserting and editing texts, music, slide transitions, and much more.
How do I edit my videos in Canva?
First, we would like to make it clear that this roadmap was created in the desktop version, but the features are also available in the mobile version.
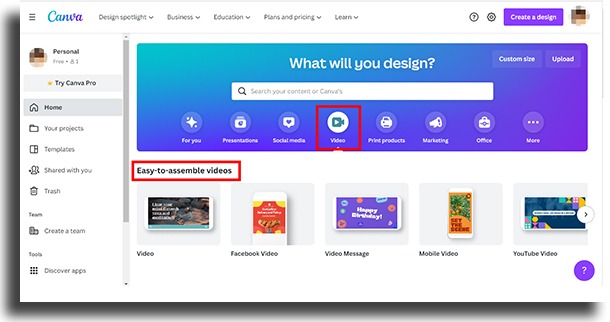
To start editing your video in Canva, enter the platform – if you want, access this link and at the top of the screen click on “Video”.
Just below will appear some file options, based on aspect ratio, such as Facebook video, video message, collage, slideshow, and so on. Choose your option to get started editing your videos.
TIP: If you want to create a file with a custom size, select “Create a design” in the right corner of the Canva home screen and, in the menu that opens, click the “+” sign for “Custom Size”. Enter the desired size (in pixels, millimeters, centimeters) and create your design.
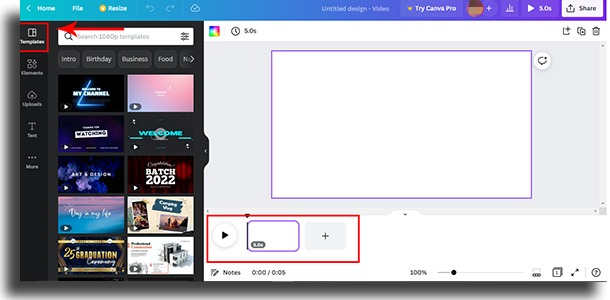
After defining your file size and clicking on one of the options, a blank screen will open with all the available tools.
Canva’s Video Editing Suite lets you create a video from scratch or edit using an existing template. Templates can be easily found on the left side menu under “Templates”.
There is also a timeline at the bottom of the screen where you will fine-tune the details of each page/scene entered, transitions, and music which we will explain further below.
In our case, we are going to work with a pre-existing model and edit it.
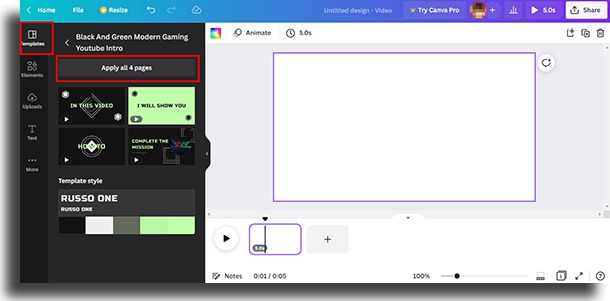
You will find several templates, some with more than one existing page. Click on the template to add it to your project.
If you want to add all the pages of the template, just click on “Apply all (x) number of pages”.
However, there is also the possibility to insert your own video or record it directly in Canva.
Uploading a video
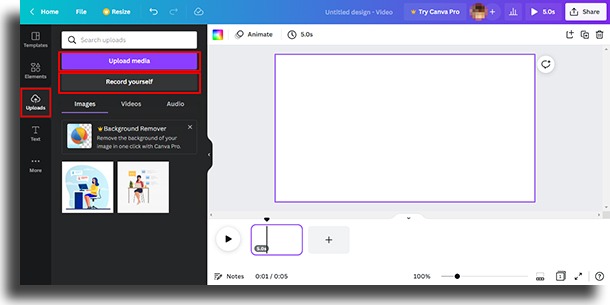
To add your own video to edit with Canva, or a video downloaded from another platform and already saved on your computer or mobile phone, go to the “Uploads” tab and click “Upload a media”. Find the file and upload it.
Note that from this same menu, you can also select “Record yourself” and record a video directly in Canva, using your device’s camera. Just grant the necessary permissions and start recording.
To add more videos, click the “+” on the bottom bar timeline and add new pages.
With the videos added to your project, it’s time to start editing.
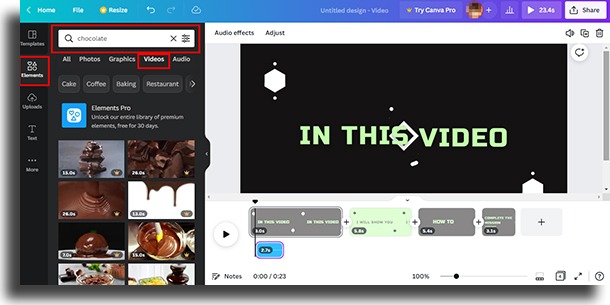
Oh, it’s worth remembering that Canva also has several videos that can be used in your creations. Go to “Elements” in the left menu and search for keywords, selecting the “Videos” tab.
Note that in many videos, the Canva Pro symbol (a crown) appears in the right corner of the video. This means that these videos if used by free Canva users, will be watermarked. However, there are several options for those who do not pay to edit videos with Canva.
You can use the filters, next to the search bar, to show only free content.
Cutting videos
Your videos are already set, but have you noticed that some are too big? See how you can easily cut them out.
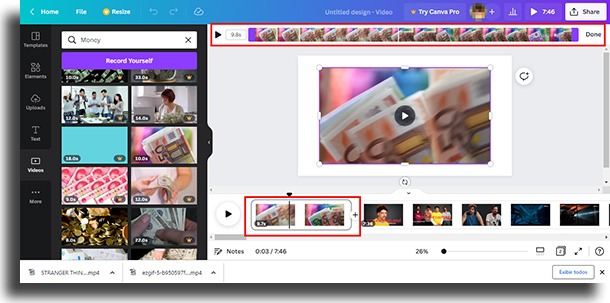
On the bottom bar, click and select the video to be cropped. When you click the video (in the middle of the screen), a pair of scissors will show up. And, when you click that, a timeline will appear on the top bar. There you can edit the duration of the video, as well as select the part that will remain in your project.
Finish editing using the video preview slider – the purple rectangles – that appear on this bar, clicking and dragging until the chosen section is selected. Click “Done”.
If you want the selection to be more specific, enter the video duration manually in the first box that shows the video duration.
Repeat the process with all the videos, adjusting the snippets.
Changing the order of clips
In case you want to change the order of the pages, it’s very simple.
Simply click and hold the chosen section with your mouse and drag, moving the clips on the timeline to reposition them.
There is also another preview option, by clicking at the bottom of the scroll bar on the “Grid Preview” icon (a square with the number of pages in your clip).
This way you will see all the clips in a grid format and it will be easier to drag and reorganize them to edit your videos with Canva.
Inserting and animating texts
With all the videos adjusted, it’s time to edit the details of your videos with Canva.
Texts are extremely important and, of course, good texts that generate curiosity and desire make a lot of difference in projects.
You can add texts – or edit them in the case of some templates – using the text tool on the left side menu.
Insert a text box, select the font that best matches the style of your video, change the font colors and size. After adding the text, you can animate them.
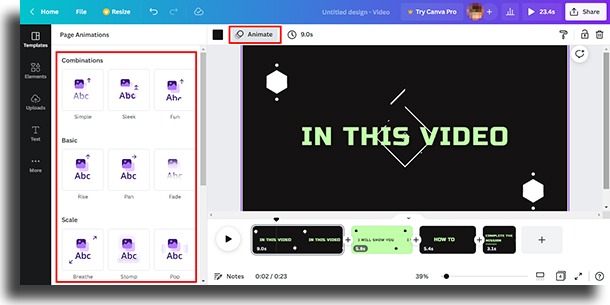
With the text selected, a box labeled “Animate” will appear on the top bar. Click on the box and from the left menu choose the animation you prefer.
Once you define an animation style, some options like animation speed and direction are offered for you to choose from. Adjust as you wish and repeat for all other texts and clips.
And you can copy and paste this text and use it as a basis for the next texts in your video, keeping the same settings as this one, and standardizing your videos.
How to animate elements?
You can also animate individual elements, or in groups, making your videos more attractive.
Just select the desired element (search for elements in the menu on the left) and click on the “Animate” button, as shown above. Choose the animation style in the section and you’re done.
It is also possible to animate several items at the same time, so they will have the effect together.
To start, press and hold “Shift” on your computer’s keyboard and, with your mouse, select all the elements to include them in the selection box. Now use the “Group” button or Ctrl+G.
Once all the elements are grouped, repeat the animation process we taught above.
Remember that you can add a variety of elements to your video, including photos, frames, icons, animated stickers, graphics, shapes, graphics, etc. Click on an element to add it to the currently selected clip.
How to animate a page
There is also the possibility to animate an entire page using the same feature.
However, for this animation to work, first, select the entire page in the timeline from the bottom menu. Now press the “Animate” button and choose the animation style for the selected page.
TIP: If a text, element, or page already has an animation added, you will see the name of the animation instead of the “Animate” button, but you must click the button and adjust the effect in the same way.
Splitting the video
Before we add the transitions on the pages, it’s worth remembering that Canva allows you to cut or split your videos to edit them separately.
This is very interesting when we have short text in a video but we don’t want it for the entire video, for example. Or, when you’re editing a video and want to just use the keywords of what’s being said.
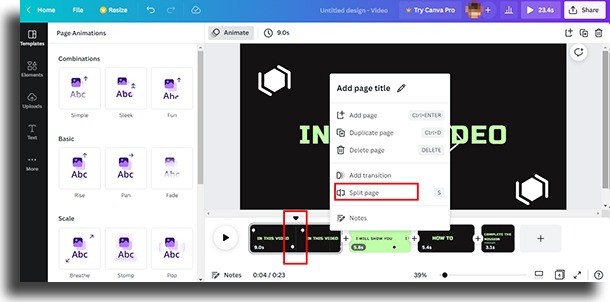
To split a video, first, select it in the timeline, then click on the position where you want the video to be split.
The black slider that tracks the video’s motion should appear at the clip’s split position. Right-click on the video and choose “Split Page” from the menu.
How to add a transition effect
Of course, Canva also lets you add transition effects between clips. To do this, click on the add icon, the “+” that is between the clips in the timeline. Select the “Add to Transition” button, choose your preferred style of transition from the available effects.
Add music to videos
With Canva’s video editor, you’ll be able to add your own soundtracks and even use audio from the platform itself, and even from YouTube, in your videos. Just pay attention to copyright, okay?
If you choose to add your own audio, go to “Uploads” and “Upload”. Search for the audio in your library, select and wait to add it to the video.
TIP: Audio in Canva is in mp3 format. So if your audio is in mp4, for example, you will need to convert the file.
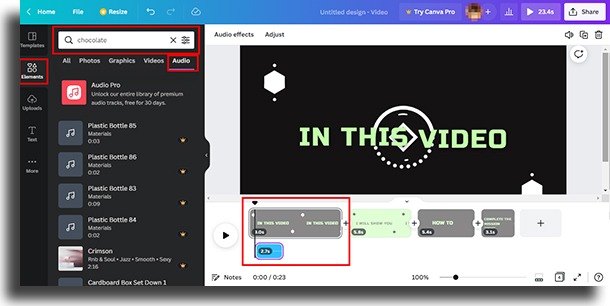
Now if you want to search on the platform itself, go to the “Elements” tab on the left menu and select “Audio”. Click on a file and add it to your video’s timeline.
Another option is to search for audios in the YouTube audio library by downloading songs on your computer without fear of infringing the artists’ copyright and running the risk of having your video blocked on social networks.
TIP: To access the library, sign in to YouTube using your account and go to YouTube Studio. Select audio library and you’re done.
As with videos, you can also edit and adjust the audios you insert into your video, and you can even use more than one audio.
With the audio, or audios, inserted into the project, you will see a new bar in the bottom menu.
Select this bar to make adjustments to both the duration and volume of the chosen audio:
- Drag the side edges of the video to change the audio duration
- Click the audio file and then click the Volume icon at the top of the screen to change the audio volume.
You can also mute the audio of your video, for example, and leave only the audio selected. Just select your video and, as explained above, click the volume icon and mute the sound or mute it all.
Remember that sound effects are also a great tool. The YouTube library offers a variety of effects. A tip is to search for them in English, as you are more likely to find them.
How to delete a video or audio clip
To delete an audio or video file, select it and press the “Delete” button directly on your keyboard.
Making it easy to use with Zoom
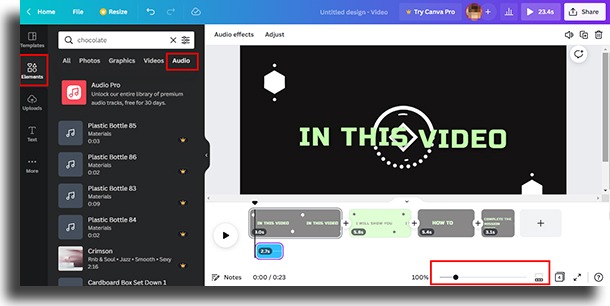
It’s often difficult to edit and adjust shorter clips or even blend the video with the audio, but with Canva’s video editor you can extend the timeline. This makes it much easier to split, cut, edit and adjust the details.
Zoom in on the timeline by selecting the clip and clicking the “Zoom” icon next to the slider.
Use the slider to zoom in and out. If this enlarges the main screen, click the same button again. You will now be able to zoom in on the timeline.
To finish and have a preview of the result of your video, use the “Play” button at the top of the page, on the right.
In short, you can create professional videos and engage, captivate your audience using Canva’s video editing tools.
How to download a video in Canva
When your video is ready, click the Download button at the top. Choose the file type (MP4 is the preferred format for videos) and click the “Download” button.
Click here to access the platform.
Did you like learning how to edit videos with Canva?
Share the article with your friends and enjoy reading too:
