7 ways to boot Windows in recovery environment
Have you already or are you experiencing the situation of your Windows stopping to start normally? Do not worry! You solve this problem using the “Windows Recovery Environment” (also known as Windows RE or WinRE), and in this article, we’ll tell you how to boot into it!
A native Windows tool that helps fix startup issues.
So, before you throw in the towel and send your computer in for service, take a few minutes to test out the ways to boot your computer using Windows RE.
How does it work?
Windows RE runs automatically after detecting a boot failure on your computer.
Here’s how it works: if there are two consecutive unsuccessful boot attempts, Windows will soon trigger Windows RE. However, there are several ways to manually boot into Windows RE.
The tool is based on Windows PE (Windows Preinstallation Environment) and has three main methods:
- Auto-Fix, which automatically fixes startup errors;
- System Image Recovery, which allows you to restore your computer using a system image, provided you have created one;
- System Restore, which allows you to restore your computer from a restore point as long as you’ve created one;
These are the most used methods. However, there are other options that are also available in the tool, which are:
- Command prompt;
- Startup Settings;
- Windows Memory Diagnostic Tool.
Windows RE must be enabled
The first step before starting to explore Windows RE methods is to verify that the recovery environment is enabled on your machine, so that you can boot in it.
It is important to note that this check can only be done while you are able to boot Windows.
By default, the tool is already enabled on Windows 10 Home, Pro, Enterprise, and Education editions and can only be disabled manually.
At this point, it’s clear that if you didn’t know about Windows RE until now, then there’s no need to activate it.
In any case, if you have disabled the tool and your computer experiences a startup error, you will have no choice but to use a recovery drive or Windows installation.
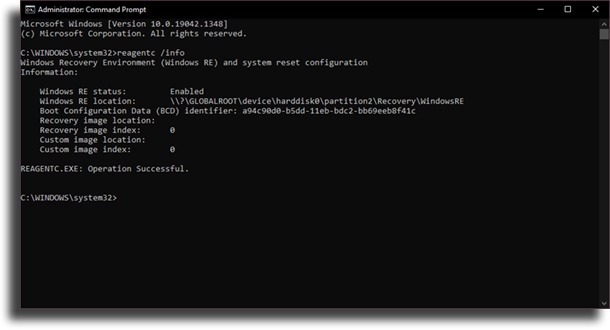
To enable Windows RE, we need to use the command prompt.
- Click on the Start Menu;
- Type “cmd” and run the Command Prompt as administrator, for that click the right button and choose Run as administrator;
- To check if Windows RE is enabled type the command: “reagentc /info” (without the quotes);
If Windows RE status is enabled, you can skip the remaining steps.
If it is disabled, you will need to enable it.
- To enable, type the command: “reagent /enable” (without quotes).
Once that’s done, you can now try using some of the tool’s methods.
Method 1: F11 when starting the computer
When turning on the computer and seeing the first screen, press F11 to boot Windows RE.
This method may not work on all computers, in some cases, you may have to press a different key such as F9 or F12, or delete.
Method 2: Using Settings
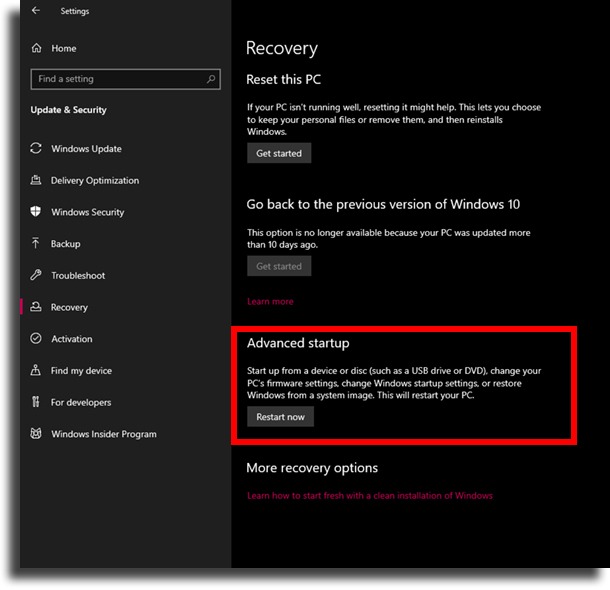
If you can still boot your computer and want to use Windows RE for cases other than boot errors, enter the Windows Settings application.
Navigate to Settings > Update & Security > Recovery.
Click the Restart Now button in the advanced startup section. The computer will restart and enter recovery mode.
Method 3: Restart from Start Menu
This is another option for you to boot Windows in recovery environment if you can still boot into Windows.
Click on the Start menu and click on the Power icon. Press and hold the Shift key while clicking the Restart option.
This should take you to Windows RE, where you can select Troubleshoot > Advanced Options to access Windows RE tools.
You can also do this from the login screen. To do this, just click on Shut down and keep the Shift key pressed.
Method 4: Windows bootable USB or DVD
If you cannot boot Windows, you can use a bootable Windows USB.
If you don’t already have a Windows bootable USB or DVD, you’ll need to create one before proceeding to the next step.
You can download a Windows ISO and burn it to a DVD. Another alternative is to create a bootable USB with tools like Rufus.
Insert the bootable USB or DVD into your computer and boot into it, just as you would install a fresh copy of Windows. On the next screen, you will see an option to Repair your computer in the lower-left corner. Click on it and you will enter Windows RE.
Method 5: At the “Choose an operating system” screen
If you are lucky enough and have booted Windows 10 twice with another operating system, you will have another option to boot into the recovery environment.
When you turn on the computer, you will see the screen with the phrase: Choose an operating system.
Click Change Defaults or choose other options. On the next screen, select Choose Other Options. This will take you to Windows RE.
Method 6: Forcing Reboot (Hard Reboot)
Another method you can use is to hold and hold your computer’s power button for a hard reset. Don’t worry, hard resets aren’t as harmful as they seem.
Force restart your computer and repeat the process a few times. Typically, it takes two consecutive system restarts within a two-minute period after boot completes for the computer to boot into Windows RE.
Your computer will display the recovery screen with the message: “Windows does not seem to load properly” and at the bottom of the screen you will see a button to see advanced repair options. Click on it to enter Windows RE.
Method 7: Using Command Prompt
You can use Command Prompt to boot into Windows RE as long as you are able to boot into Windows.
- Click on the Start Menu.
- Type “cmd” and run the Command Prompt as administrator, for that click the right button and choose Run as administrator.
- Type the following command: “reagentc /boottore”
Did you like our tips on how to boot Windows in recovery environment?
Did you get all our tips on Windows RE? Let us know in the comments if you already knew about this tool, and come learn why Windows is the go-to for computer games!


