How to set up and use external HDDs on PS4!
Do you know how to configure and use an external hard drive on your PS4? At first glance, when we buy a PlayStation4 with 500GB or 1TB of storage, we think it’s enough to store lots of games. In a short time we discover that this is not the case, that is, this space has already been consumed as more and more games are getting bigger.
We often get new game releases and as a result, storage space shrinks to the point where we have to uninstall games every time we want to play a new one. This is definitely a nuisance and one solution is to add an external hard drive for more storage. If you don’t have one yet, read our article that lists the best 1 TB external HDDs!
See how to set up and use external HDDs on your PS4
1. Choose your external hard drive
First of all, you need to know that the external hard drive needs to be for the exclusive use of the PS4, under no circumstances can it share space with other file types. It will be configured for this purpose and must meet the following requirements:
- Be SuperSpeed USB 5Gbps or higher – any USB 3.0 or higher drive will work (including USB 3.1 and USB 3.2). Does not support USB 2;
- Minimum 250GB of space and maximum 8TB.
Also, you will need a drive that uses a USB-A plug to connect. This is the most common type and, in addition, it is the most used on USB sticks. Some external drives use USB-C on both ends, which will not work on PS4 without an adapter.
Another option is to buy an SSD. They are much more expensive but have better efficiency.
2. How to set up an external hard drive on your PS4
First of all, you can only use an external hard drive if your PS4 has system software version 4.50 (which was released in early 2017) or later.
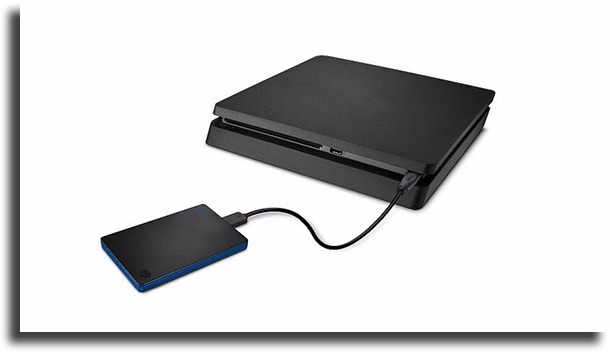
To start, connect your external hard drive to the PS4 using its USB cable directly to the system, so avoid using any USB hubs. Once connected, you will need to format it (unless you purchased a drive that was preformatted for the PS4). If it’s a used external hard drive, when formatting you’ll lose all existing files, but if it’s a new one it’s easier.
To format external HDDs to use them on PS4, follow these steps:
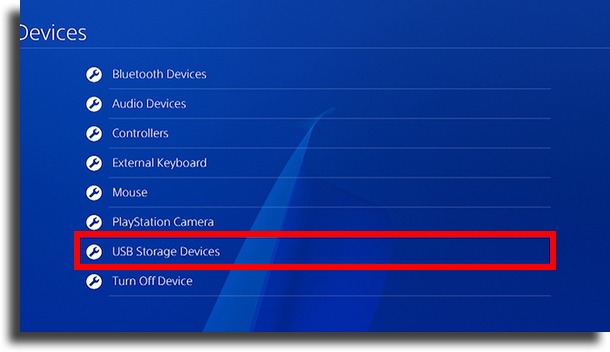
- First, go to Settings > Devices > USB Storage Devices;
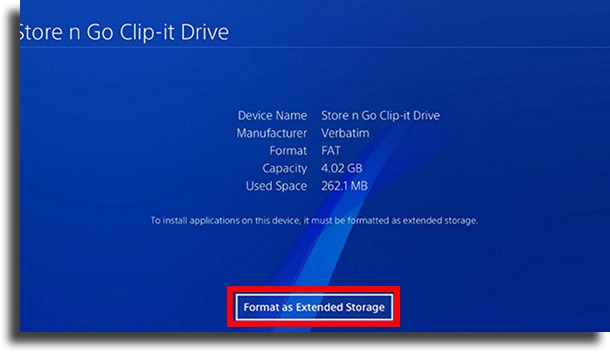
- Then choose Format as Extended Storage.
Press the Options button on your controller to show this option if it doesn’t appear automatically. Then, just select yes to all the questions that the system will ask to confirm the formatting process.
Once the process is complete, the system will allow you to keep games, apps, downloadable content (DLC), and game updates on the external hard drive.
The system will use your new storage automatically, but you can make some changes according to your preferences too. However, data from themes and screenshots/video clips will always be saved on the internal drive.
A big advantage of using the extended device is that you can download the game there, so you can take your external hard drive anywhere and connect it to another PS4. To access your games you will only need to plug in your device, log into your account and thus have access to the games that are on it. Cool huh?
3. Unplugging your PS4 external hard drive safely
In addition to knowing how to configure and use the external hard drive on your PS4, you need to take some precautions to properly disconnect it.
Even if it is in sleep mode, it is not advisable to disconnect the external hard drive while it is in use, as this could damage your data. Turns out the system assumes the drive is connected even when you turn off the PS4.
Follow the steps below to disconnect the external hard drive:
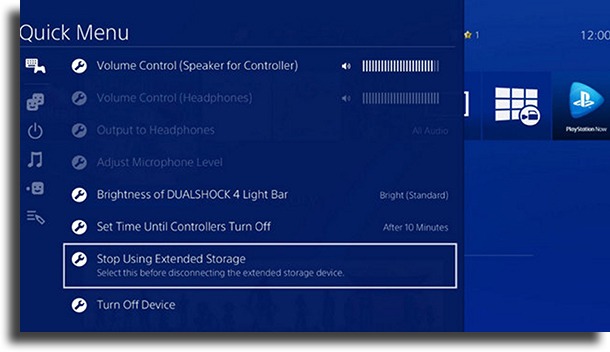
- Hold the PlayStation button on your controller to open the Quick Menu, then Sounds & Devices;
- Select Stop Using Extended Storage and press OK to confirm.
Done! Now you can disconnect your external hard drive!
4. Choose the location for installed games
You can choose where PS4 games will be installed by default. As soon as you connect the external hard drive you immediately need to choose this setting, as this cannot be done while games are being downloaded.
Do this by following these steps:
- First, go to Settings > Storage
- Then press the Options button on your controller to show a new menu.
- Then select the Application Install Location, and set it to Extended Storage.
Finally, this will set your external hard drive as the default save location.
5. Transfer between storage locations
Another tip for setting up and using the external hard drive on your PS4 is moving a game between your storage units. To do this, follow these steps:
- First, go to Settings > Storage;
- Then select the device that contains the game you want to relocate;
- Then choose Applications from the data types;
- Finally press Options on your controller and select Move to Extended Storage (or Move to System Storage). Check all the games you want to move, then press Move to confirm.
You can have add-ons for a game installed on your external drive, even if the main game is on your system storage.
6. External hard drive for all your games
Finally, now you know how to buy, connect and use an external hard drive for your PS4. With more storage, you’ll be able to keep your favorite PS4 titles installed without having to delete anything for a long time.
And there’s more! Since you’ve already stored your PS4 games on an external hard drive, it will be easier to transfer them when you switch your console to PS5.
Did you like the tips on how to use external HDDs on PS4?
Did you know about the possibility of saving your PS4 games on an external hard drive? Tell us in the comments! And don’t forget to come check out the best coop games and the best multiplayer games!


